

Infrastructure as Code with Terraform, Azure DevOps, Azure, Github, Docker and .Net 5


In this article we will be going through IaC with terraform and Azure DevOps.
So what we will cover today:
- A brief history tour
- Divide and Conquer Concepts
- What is IaC
- Benefits
- The Process
- Ingredients
- Code and Implementations
You can watch the full video on Youtube
History tour
In todays development environment we hear a lot the words provisioning, configurations, deployments, pipelines, orchestration, automation...
But what are they? how do they work? how do they complete each other?
Let us see how deployment used and still being sometimes done.
In the past before automation when we built our applications, the deployment process was as follow:
- find the right server
- setting up the server and configure them
- configure the network
- install all of the dependencies
- configure the dependencies
- configure firewall and security
- install db servers
- configure the connections between the app and the db
All of these preparations where required just to make the application run on the servers all of the steps mentioned will be done manually which increased the chance of any human error.
All of these steps we didn't cover yet the scalability, backups, maintenance and security monitoring for that environment alone, this work would have needed to be duplicated and repeated for all other environment that we wanted to utilise like a QA env, pre-release env and a production env.
What is IaC
In the new brave world of DevOps all of the steps mentioned earlier can be coded and be automated powered by Infrastructure as Code or IaC
So this leads us to what is infrastructure as code, its a way of automating all of the tasks from start to finish to run automatically in an automated way instead of doing the work manually.
To accomplish this we utilise tools and programming languages to accomplish these automated tasks from start to finish.
Some of these tools are:
- Terraform (Which we will cover)
- Ansible
- Puppet
Divide and Conquer
The devision of the work and the implementation is divided into 3 sections
- Provisioning infrastructure: (Building the foundation)
- which is creating new servers
- configure the networking
- configuring the load balancers
- configuring the provisioned infrastructure configs
- installing applications and the tools on the server
- managing these tools, it could be dotnet sdk npm ...
- Deploying the application on the provision and configured infrastructure
Note with Docker and containerisation step 2-3 can become one as the container will automatically have dependencies and the sdks ready.
Benefits of IaC
- being dev and ops together
- consistent infrastructure configs
- faster deployments
- less documentation
- Traceability
Ingredients
We will need to have 5 things installed on our machine
- VS Code (code.visualstudio.com/download)
- Dotnet 5 SDK (dotnet.microsoft.com/download)
- Terraform (terraform.io/downloads.html)
- Azure CLI (docs.microsoft.com/en-us/cli/azure/install-..)
- Docker (docker.com/products/docker-desktop)
Accounts
We will need to have 4 accounts
- Azure - Free 200$ for new registrations (portal.azure.com)
- Azure DevOps - Free tier (dev.azure.com)
- Github - Free tier (github.com)
- Docker hub - Free tier (hub.docker.com)
Process
develop ⇒ commit ⇒ build ⇒ test ⇒ publish ⇒ provision deploy ⇒ run
Phase distinctions
Initial setup phase
- provision infrastructure
- Configure infrastructure
maintaining phase
- adjustment to infrastruture
- update configurations
Check dotnet SDK
dotnet --version
Create new application
dotnet new webapi -n sampleapi
Now we need to a docker file
FROM mcr.microsoft.com/dotnet/sdk:5.0 as build-env
WORKDIR /app

COPY *.csproj ./
RUN dotnet restore

COPY . ./
RUN dotnet publish -c Release -o out

FROM mcr.microsoft.com/dotnet/sdk:5.0
WORKDIR /app
EXPOSE 80
COPY --from=build-env /app/out .
ENTRYPOINT ["dotnet", "sampleapi.dll"]
Now to build our image
We are going to tag the docker image with out dockerhubaccountname/imagename format
docker build -t mohamadlawand/sameplapi .
now we need to run our application to see if everything is working
docker run -p 8080:80 mohamadlawand/sampleapi
Now let us push it to docker hub
docker push mohamadlawand/sampleapi
Now let us add our project to github
The first step is to add a .gitignore file in the root directory
*.swp
*.*~
project.lock.json
.DS_Store
*.pyc
nupkg/

# Visual Studio Code
.vscode

# Rider
.idea

# User-specific files
*.suo
*.user
*.userosscache
*.sln.docstates

# Build results
[Dd]ebug/
[Dd]ebugPublic/
[Rr]elease/
[Rr]eleases/
x64/
x86/
build/
bld/
[Bb]in/
[Oo]bj/
[Oo]ut/
msbuild.log
msbuild.err
msbuild.wrn

# Visual Studio 2015
.vs/
then we initiate our local git repo
git init
Then we add all of our files
git add .
Now we commit our files
git commit -m "initial commit"
Now we need to create a repo on github
and then add the current local application to it
What is Terraform
utilise the cloud providers API to communicate with Cloud provider
convert the HCL (HashiCorp Language) to cloud provider api language
open source
We need to download terraform (https://www.terraform.io/downloads.html)
We need to download to download azure cli (https://docs.microsoft.com/en-us/cli/azure/install-azure-cli-windows?tabs=azure-cli)
VS code plugin for Terrafrom
Now we need to add the terraform file in the root of our application we create a new file called main.tf
# we need to specify the provider that we are going to use
terraform {
  required_providers {
    azurerm = {
      source  = "hashicorp/azurerm"
      version = "=2.46.0"
    }
  }
}

provider "azurerm" {
   features {

  }
}

# since we are using azure we need to create a resource group since its the bases of everything in azure
# the name we provide on line 11 is only used in our tf file not on azure whent the resource is created
# the naming should unique
resource "azurerm_resource_group" "tf_rg_sample" {
  name = "mlawandtfrg" # this is the name on azure
  location = "uksouth" # data center location on azure
}
Note to find all of the available azure locations run the following command in azure cli
az account list-locations
Now lets see if we can push these changes to azure
- init: initialise the tf for it to communicate with the cloud provider
- plan: what is the plan tf is going to implement
- apply: apply the changes to our cloud provider
- destroy: remove everything
now inside our terminal we type the following
terraform init # this will initialise the terraform file locally and download the cloud dependencies
now let us plan
terraform plan
The command has established a communication with Azure, to check if we already have a resource group with the same name and then once azure gives the okay. Terrafrom will start preparing the plan of implementation on how this would be applied on azure. We need to be logged into Azure through the azure cli for this work. in order to login to the Azure CLI
az login # to login
az logout # to logout
now let us apply the changes
terraform apply
So now let us update our terraform code to create a container group
# create the container group
resource "azurerm_container_group" "tf_cg_sample" {
  name                  = "sampleapi"
  location              = azurerm_resource_group.tf_rg_sample.location #utilising the resource group
  resource_group_name   = azurerm_resource_group.tf_rg_sample.name #utilising the resource group

  ip_address_type       = "public"
  dns_name_label        = "mohamadlawandtf" #friendly name we want to give our domain
  os_type               = "Linux"

  # Specify the container information
  container {
    name = "sampleapi"
    image = "mohamadlawand/sampleapi"
    cpu = "1"
    memory = "1"

    ports {
        port = 80
        protocol = "TCP"
    }
  }
}
So currently when we are deploying to azure through terraform, we are using the Azure CLI to do so. And we are currently logged in into the Azure CLI from our terminal which is facilitating this process. But when we want to to completely automate this process, we cannot utilise this approach. To solve this we need to use Service Principle.
Service Principle Env Variables
Service Principle is like an automated user (Application Account) that terraform can use to directly log in to Azure and execute all of the commands
We will set it up locally and utilise it through our command line, then we can implement it in our azure pipeline.
When we set the Service Principle in Azure we will get the following information
- ARM_CLIENT_ID
- ARM_CLIENT_SECRET
- ARM_TENANT_ID
- ARM_SUBSCRIPTION_ID
We will then configure terraform to utilise these information so we can automate the process.
This information are highly sensitive information, these credentials will provide access to Azure subscription and will allow automated access to all resources. Please be very careful with these information
So in order to create the Service Principle we are going to follow the guidelines in terraform website
Now let us jump into Azure
- Click on Azure Active Directory
- Click on App Registration

- Click on New Registration

- Fill the information
- Give it a name "TFServicePrincipleCICD"
- Choose "Accounts in this organisational directory only (Default directory only - single tenant)
- Click on Register

- So now we are redirected to a page with a lot of information has been generated, we will need to copy this information for use to utilise
- ARM_CLIENT_ID: acf8ab11-18bb-49cb-96a9-7968b952e880
- ARM_TENANT_ID: xxxxxxxx-xxxx-xxxx-xxxx-xxxxx
- Now we need to get the client secret in the menu we choose Certificates & secrets

- In the client secrets section we click on new client
secrets

- We fill the information required (description and expiry date) and click on add

- ARM_CLIENT_SECRET: Qm33J_Ov39~Ln--~~KSmMPd9fqO7TCVvf
- In the client secrets section we click on new client
secrets
- Now we need to give the newly created application access to Azure AD to be able to create the required resources
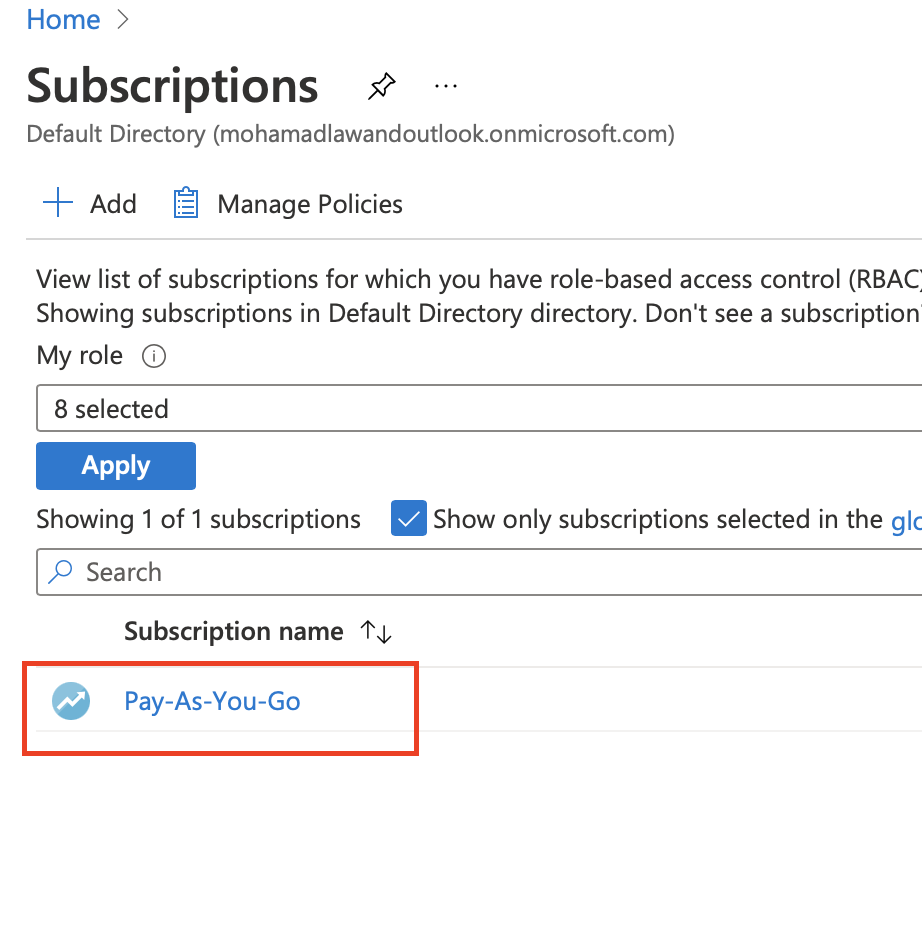
- Let navigate back home
Click on Subscription

- Copy the Subscription Id
- ARM_SUBSCRIPTION_ID: xxxxxxxx-xxxx-xxxx-xxxx-xxxxx
- Then we click on the subscription
- Then we click on Access control
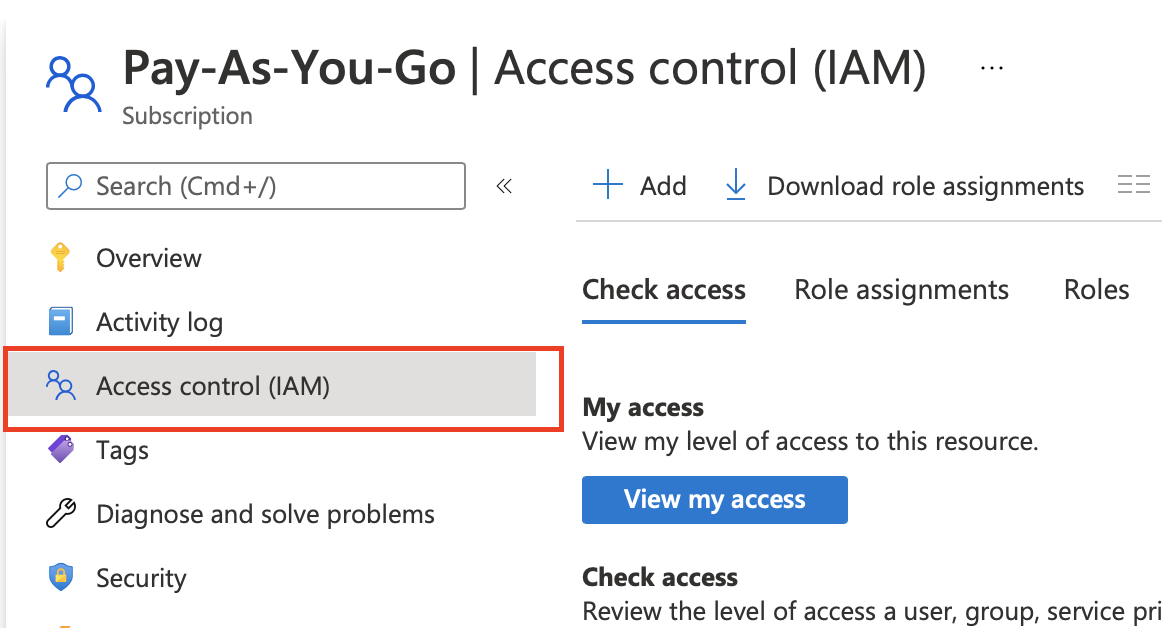
Inside the Grant Access to this resource
- Choose Add role assignment
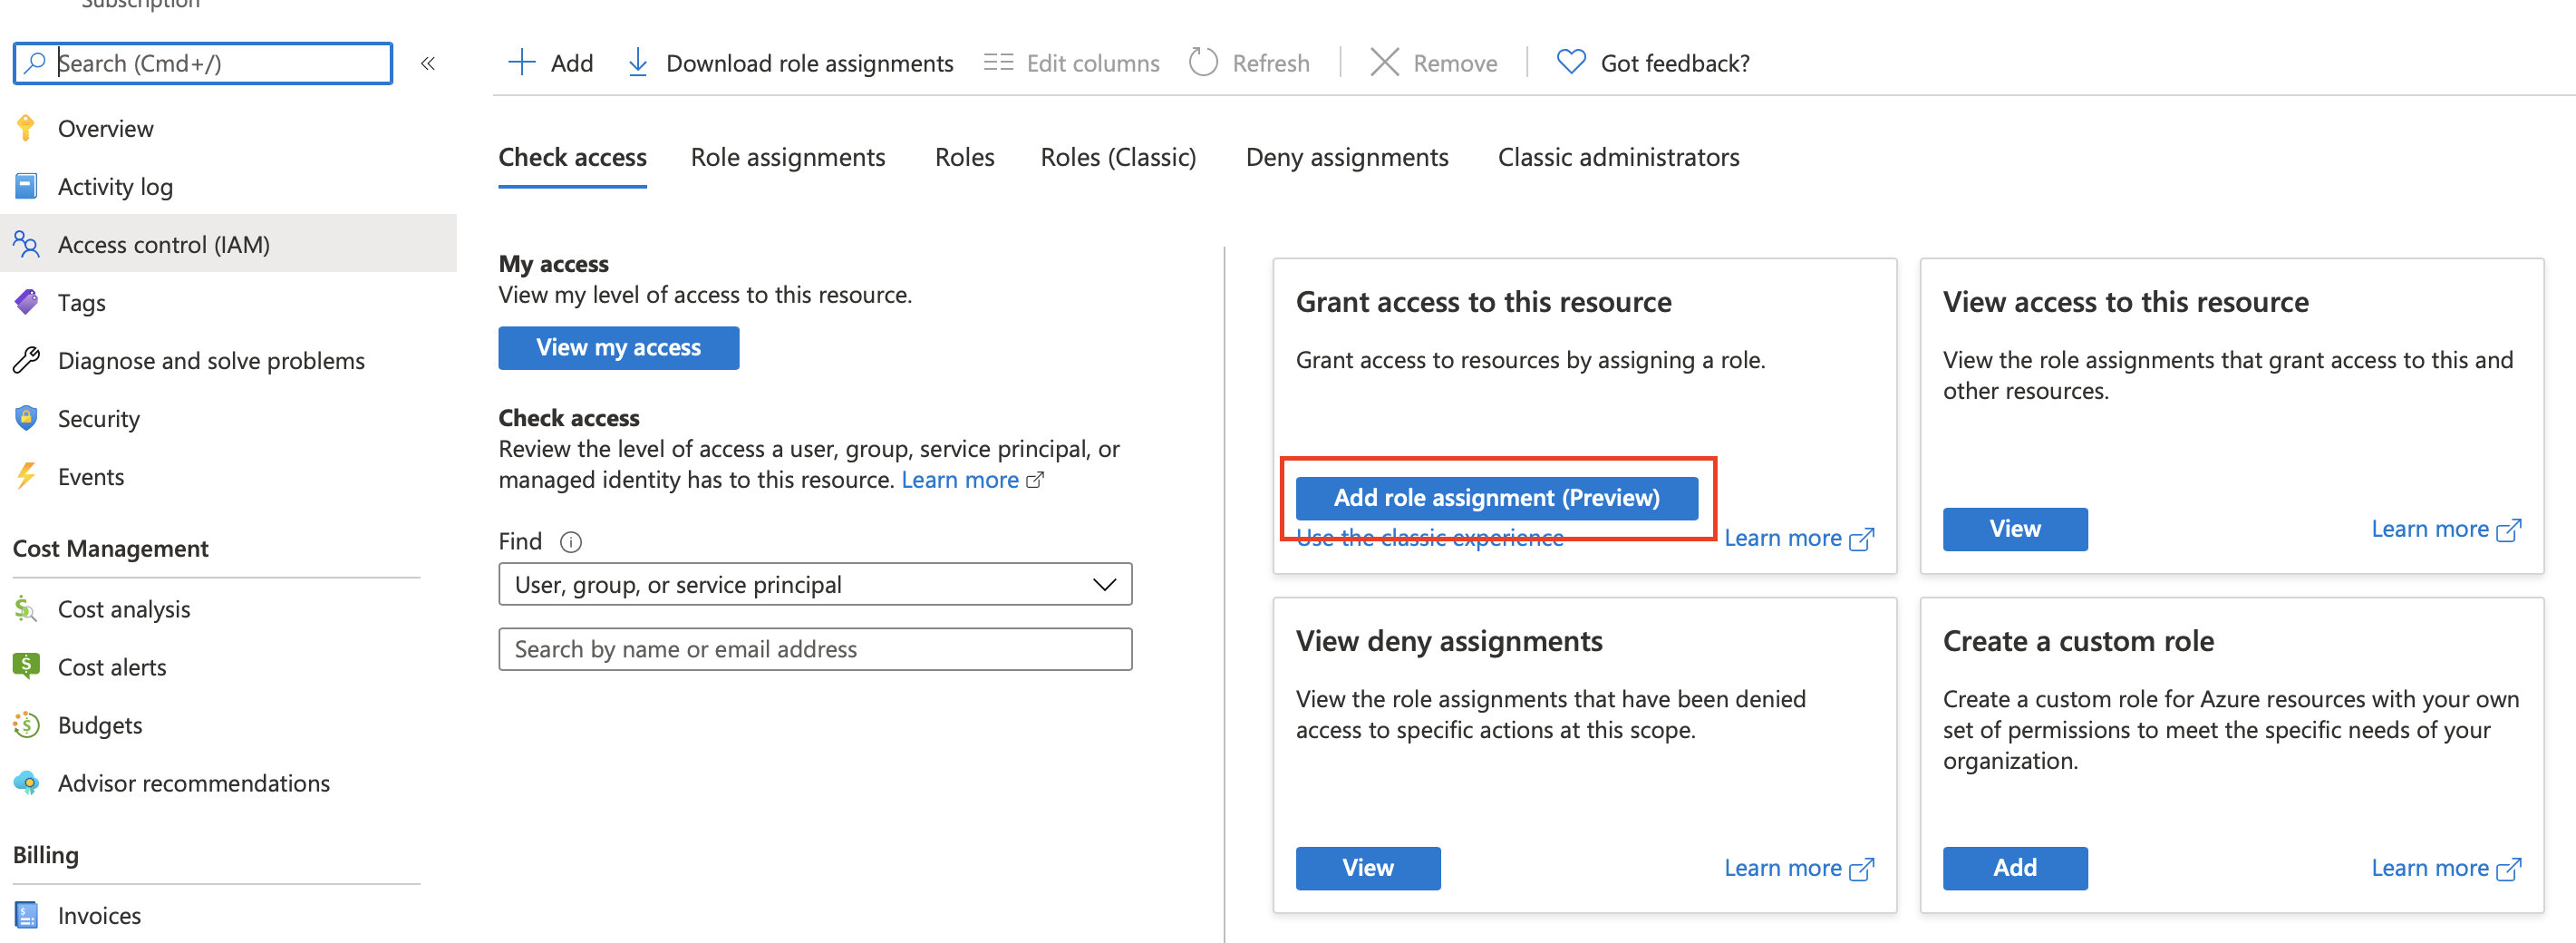
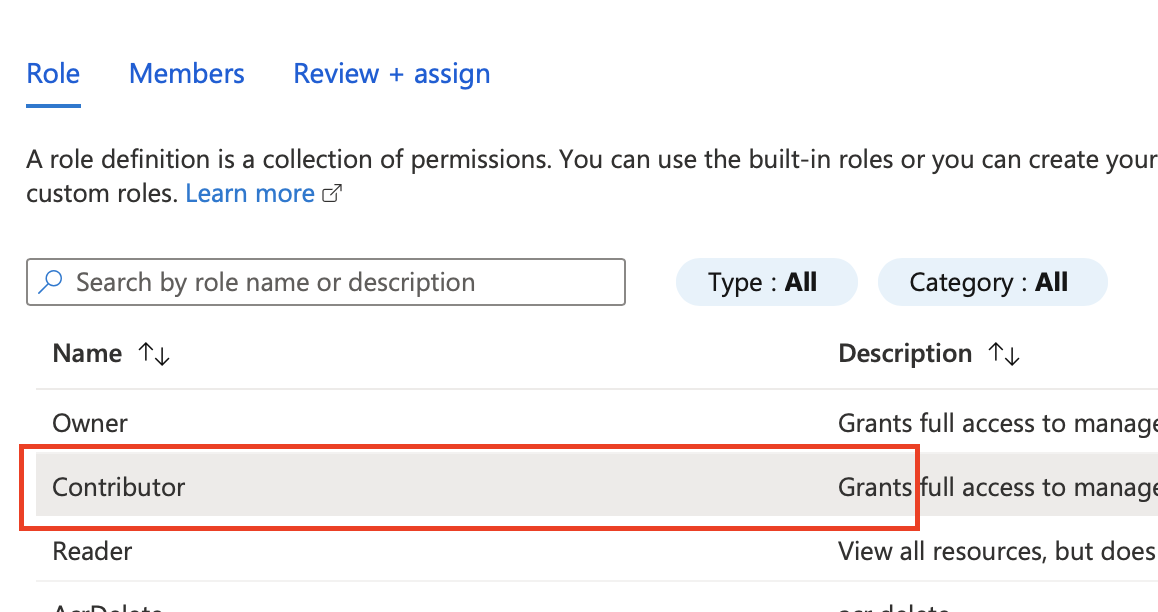
- Choose contributor from the list
- Click next
- Click on Select Members
- enter the name of the app registration that we created earlier
- click select
- click review + assign
- Choose contributor from the list
Now our Active directory has been setup from Service Principle perspective, now we need to do a test to make sure we have set it up correctly
First let us sign out of our AZ CLI
az logoutNow we need to add the environment variable to our system variables
using the terminal we need to set the variables, inside the root directory of the terminal we add type the following
nano .zprofile

#paste this
export ARM_CLIENT_ID=acf8ab11-18bb-49cb-96a9-7968b952e880
export ARM_CLIENT_SECRET=2Dab7cN1l5WR-QOHz3r~R9Hnv_sna-3q0U
export ARM_TENANT_ID=xxxxxxxx-xxxx-xxxx-xxxx-xxxxxxxxxxxx
export ARM_SUBSCRIPTION_ID=xxxxxxxx-xxxx-xxxx-xxxx-xxxxxxxxxxxx

# Then close it via ctrl x
# then y
# then enter
Once we have set up our variables, we can test the terraform plan and we should see a successful plan
terraform planAzure DevOps
now we are ready to build out Azure DevOps Pipeline,
- Choose Add role assignment
the first thing we are going to do is to delete the docker image that we have pushed
- Now let us login to Azure DevOps dev.azure.com
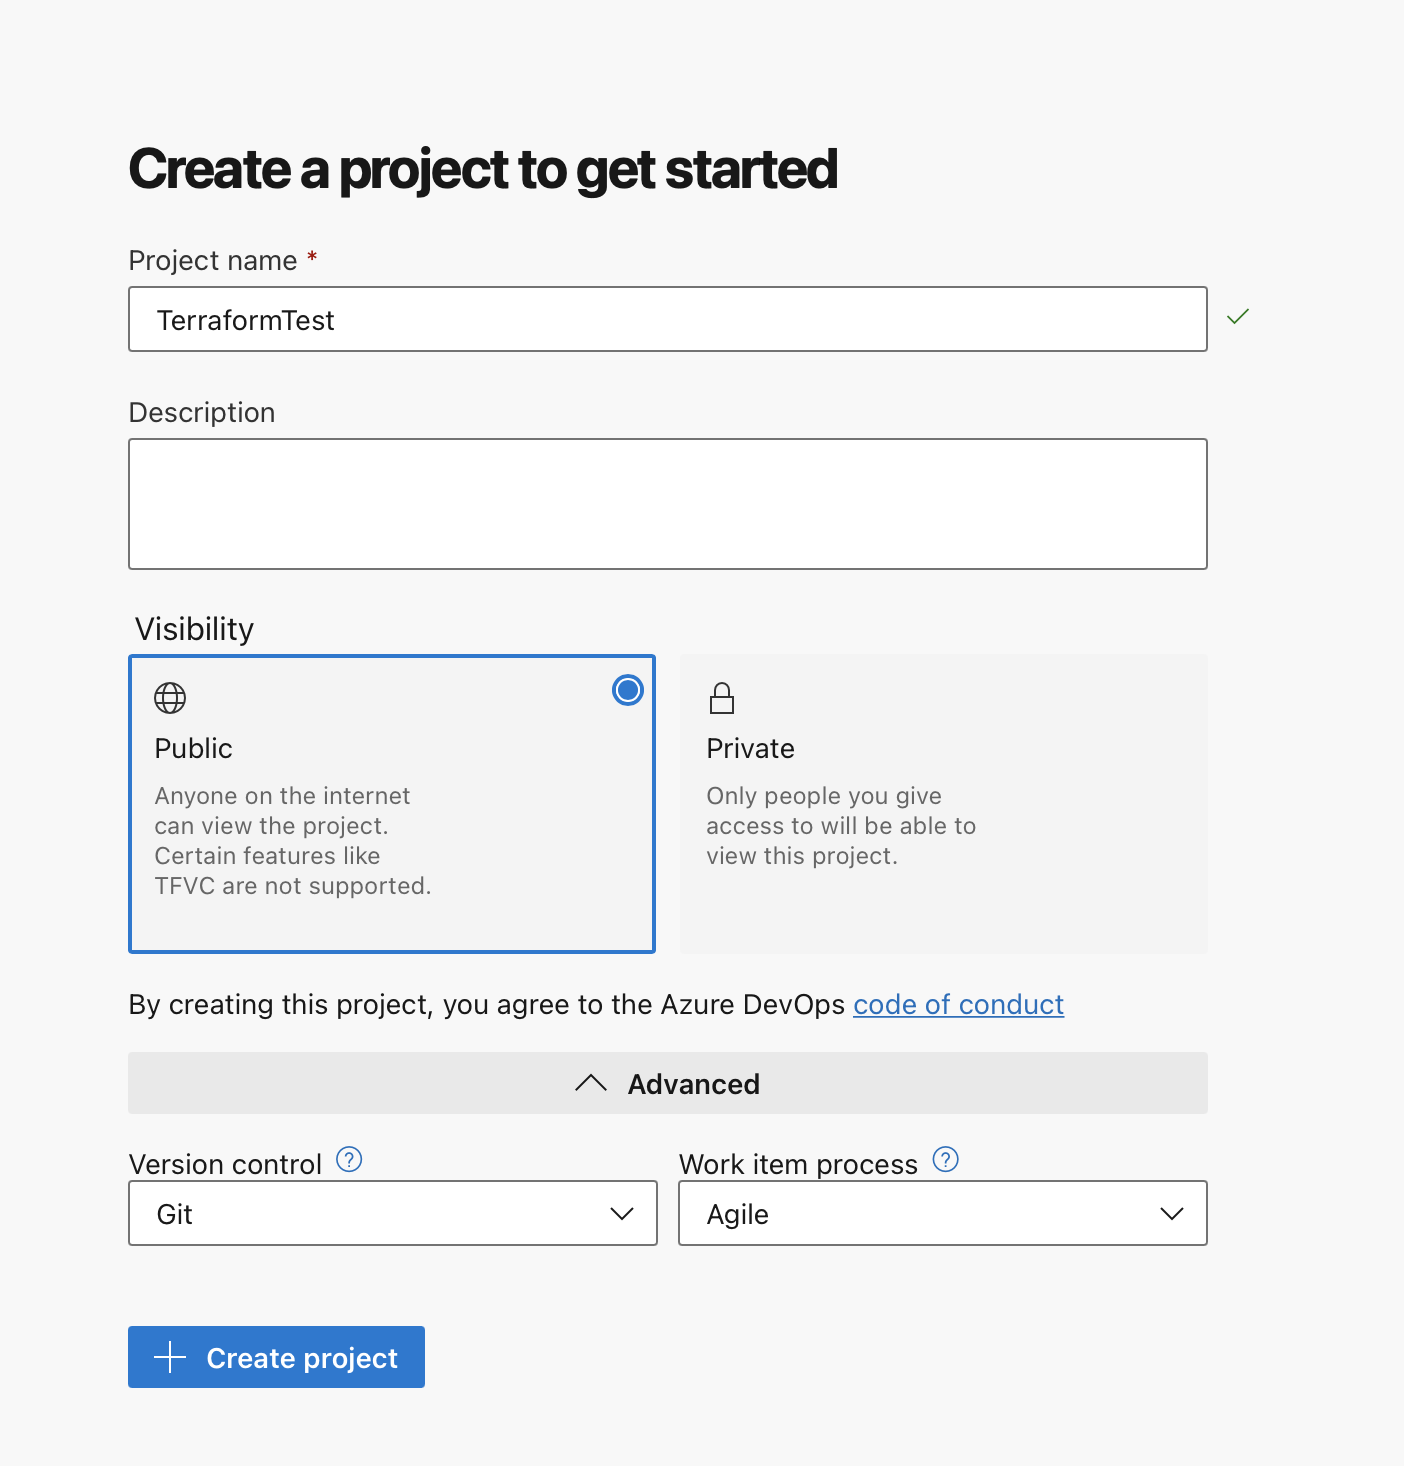
- Now we create our new project
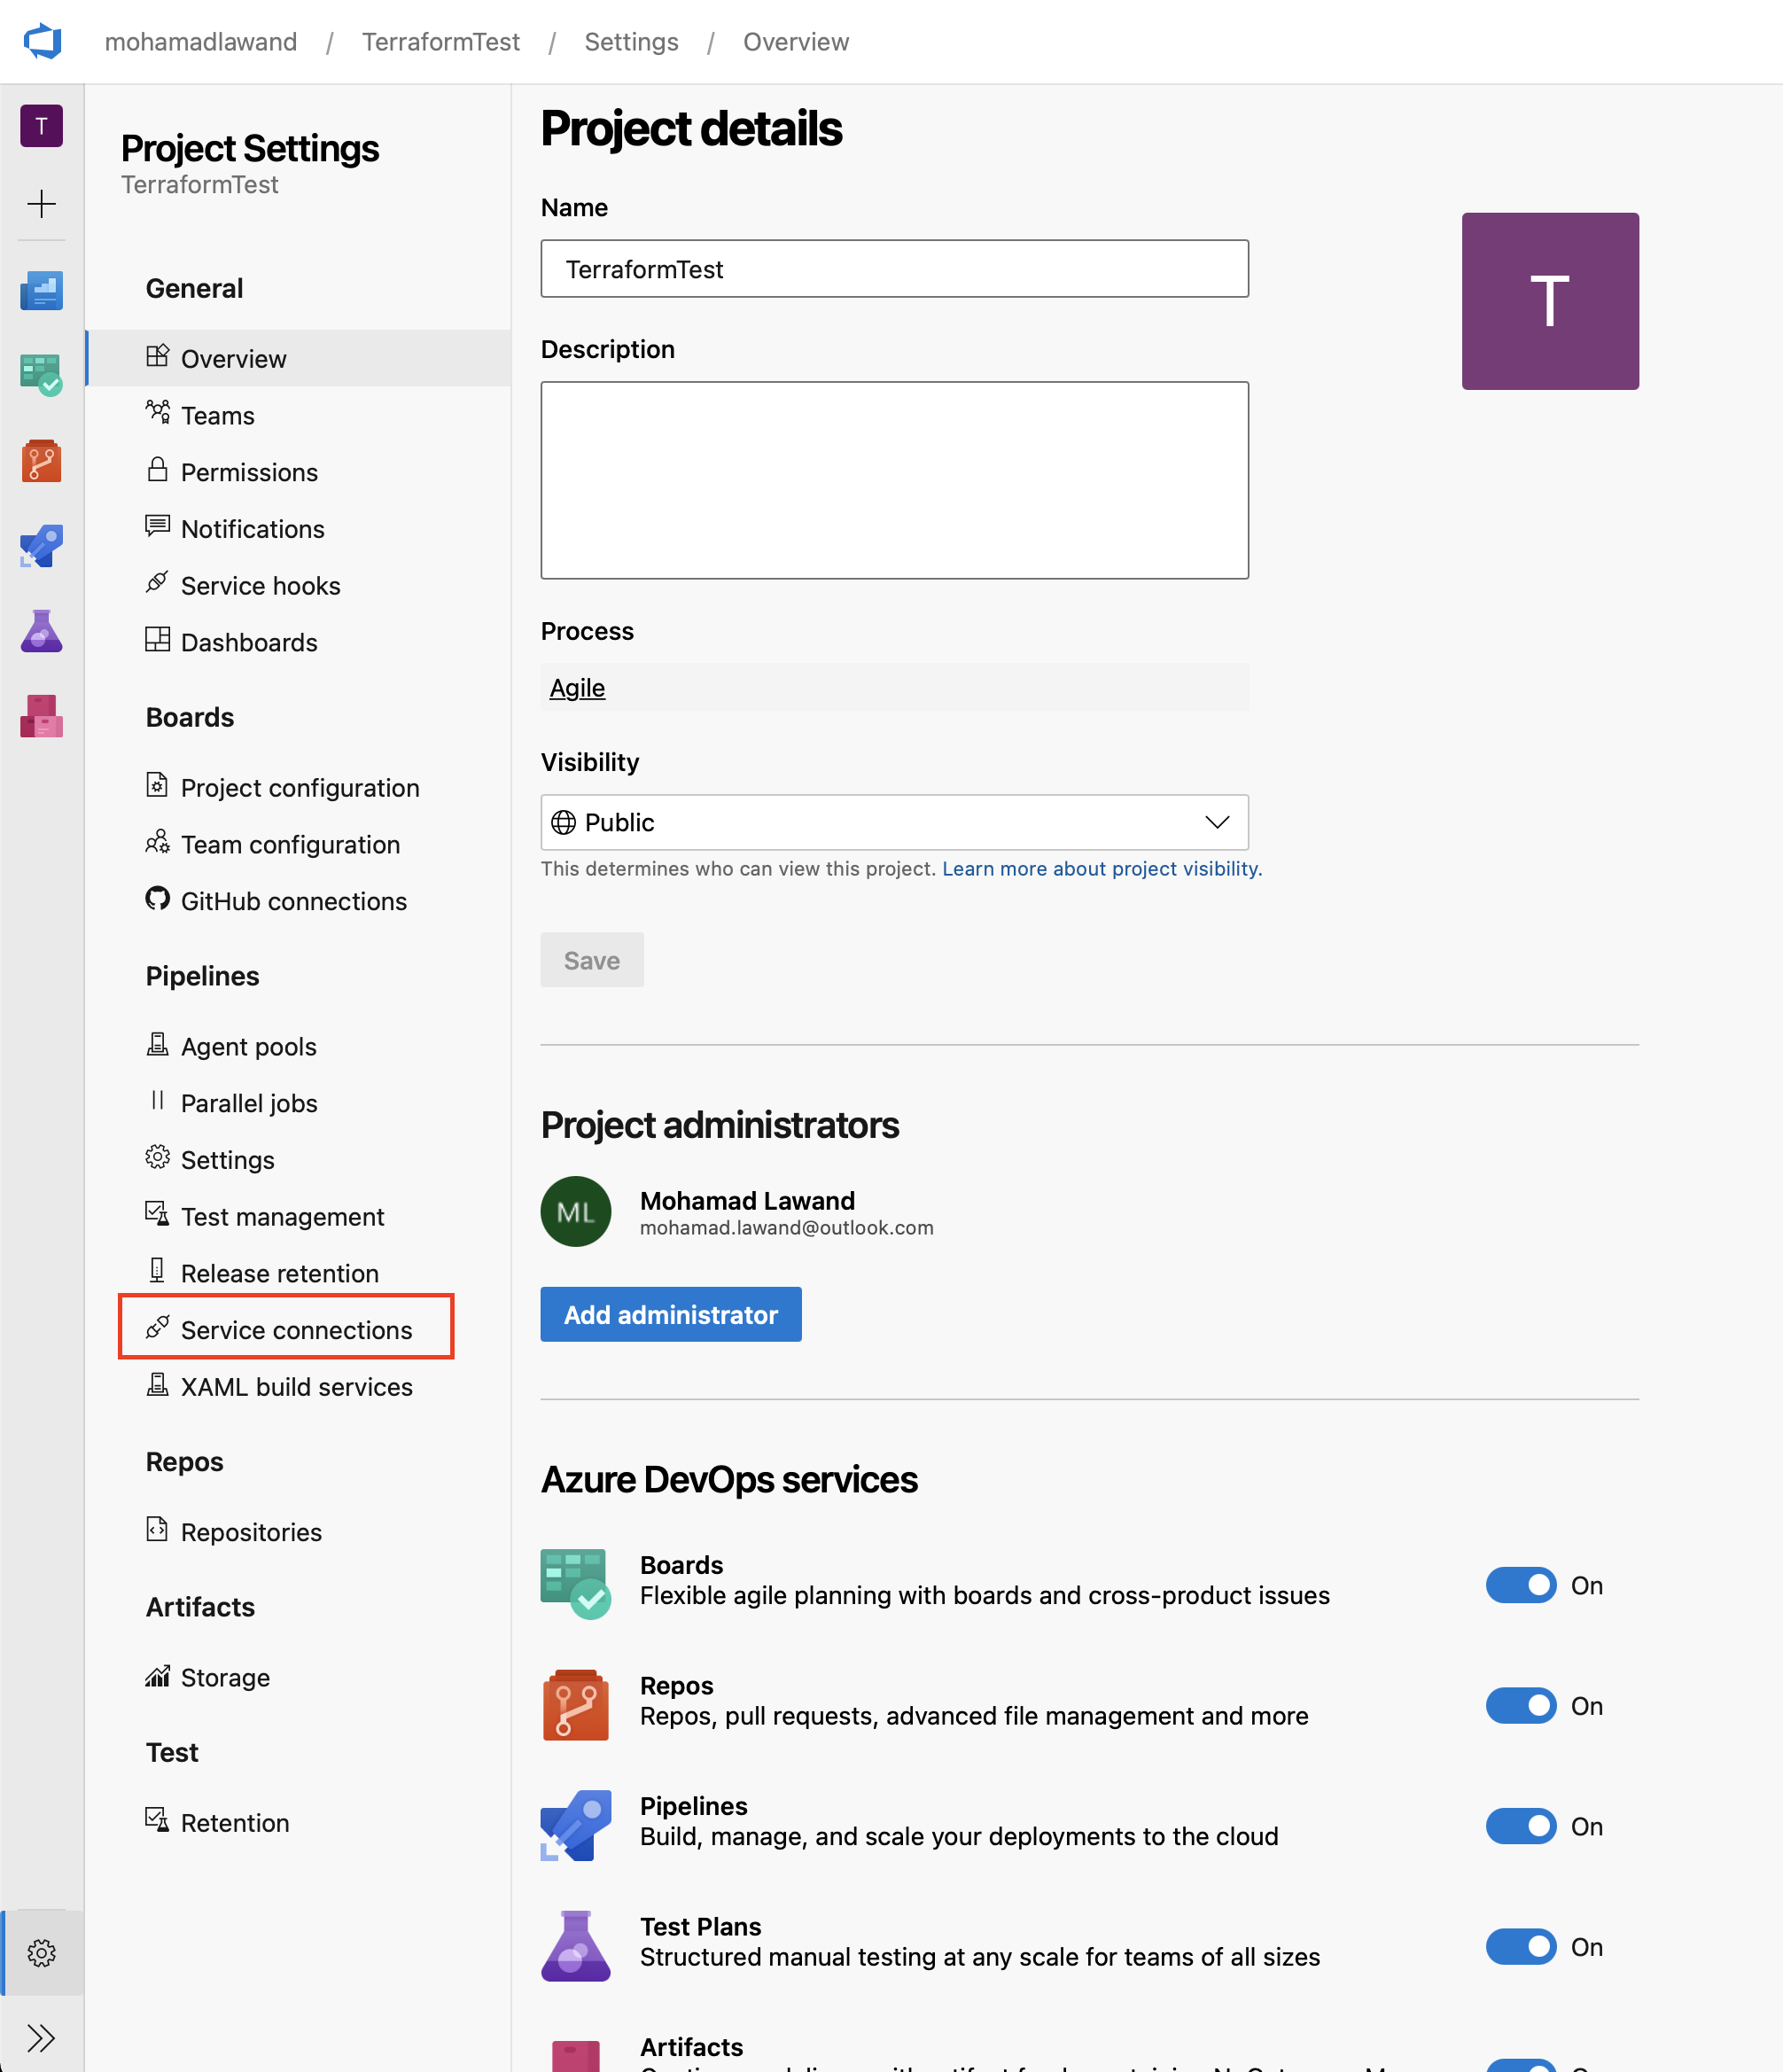
- Now we need to setup service connections which basically connecting Azure DevOps to different services (GitHub, Dockerhub, Azure)
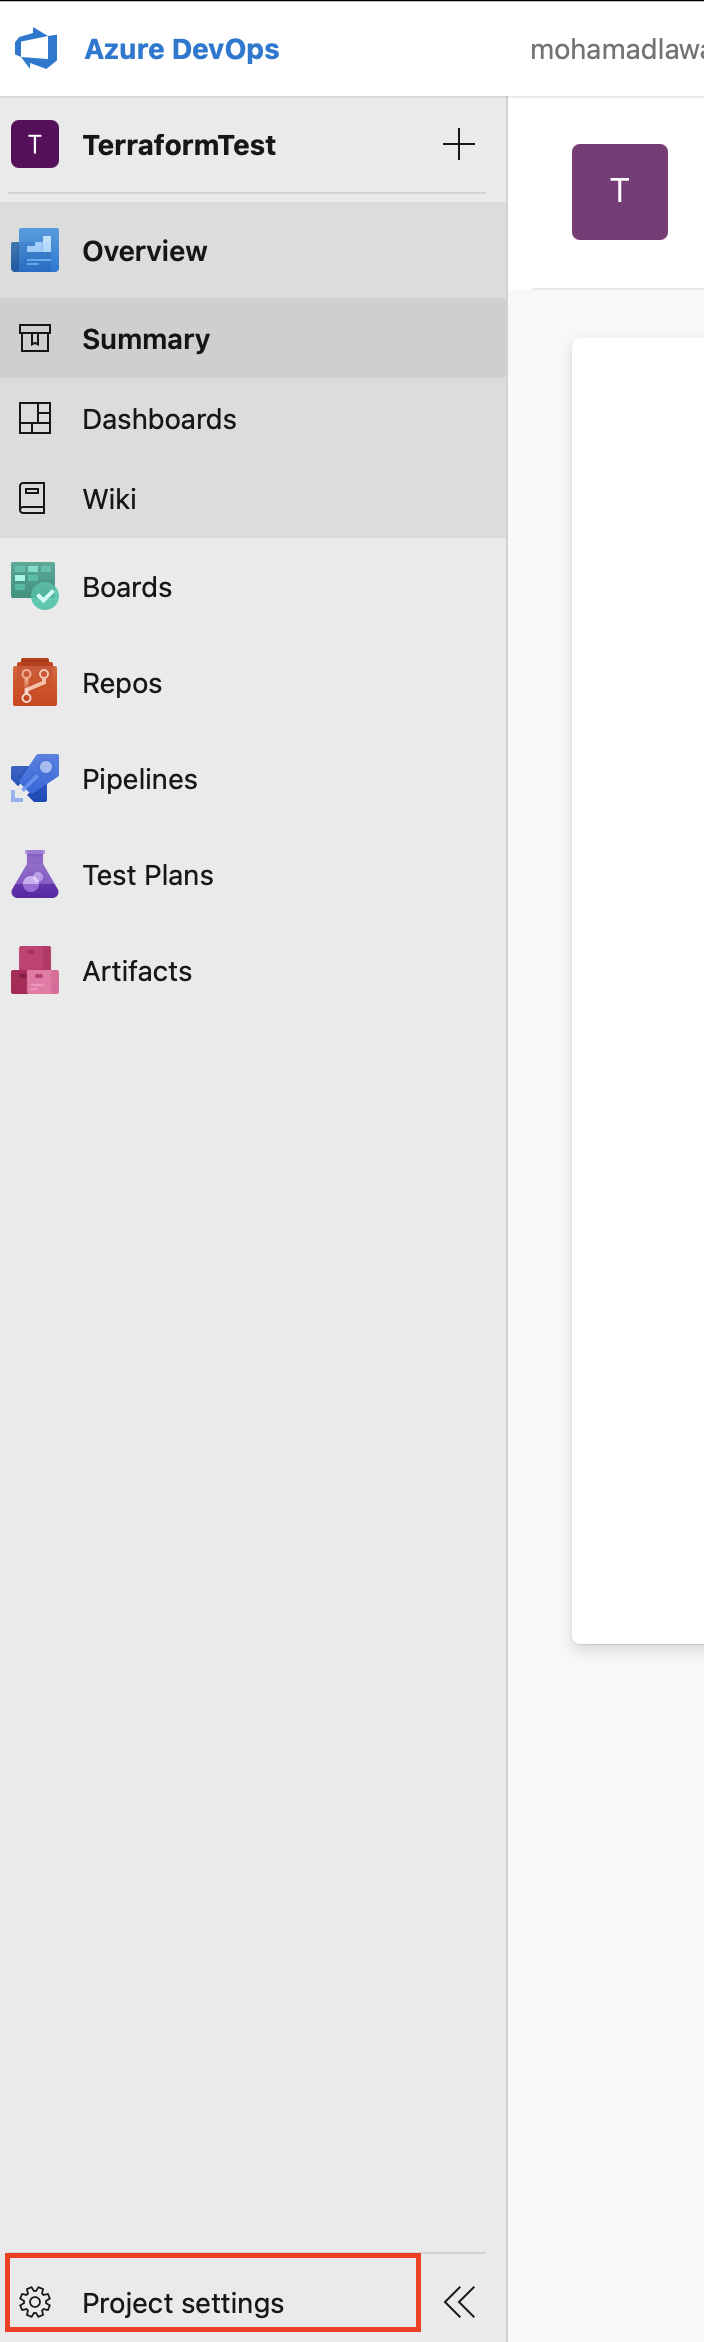
- Click on Project Settings
- Click on Service Connections
- Click on Create Service connection

- The service is Docker Registry
- Click Next
- Choose Dockerhub from the radio buttons
- Fill the docker id, password, email, service connection name and click on verify and save
Click on Create Service Connection

- The service is Azure Resource Manager
- Choose Service principle (Automatic)
- Click Next
- Choose the correct subscription and verify it
- In Details add the name of service connection "Azure Resource Manager"
Click Save
Now we can start building our pipelines
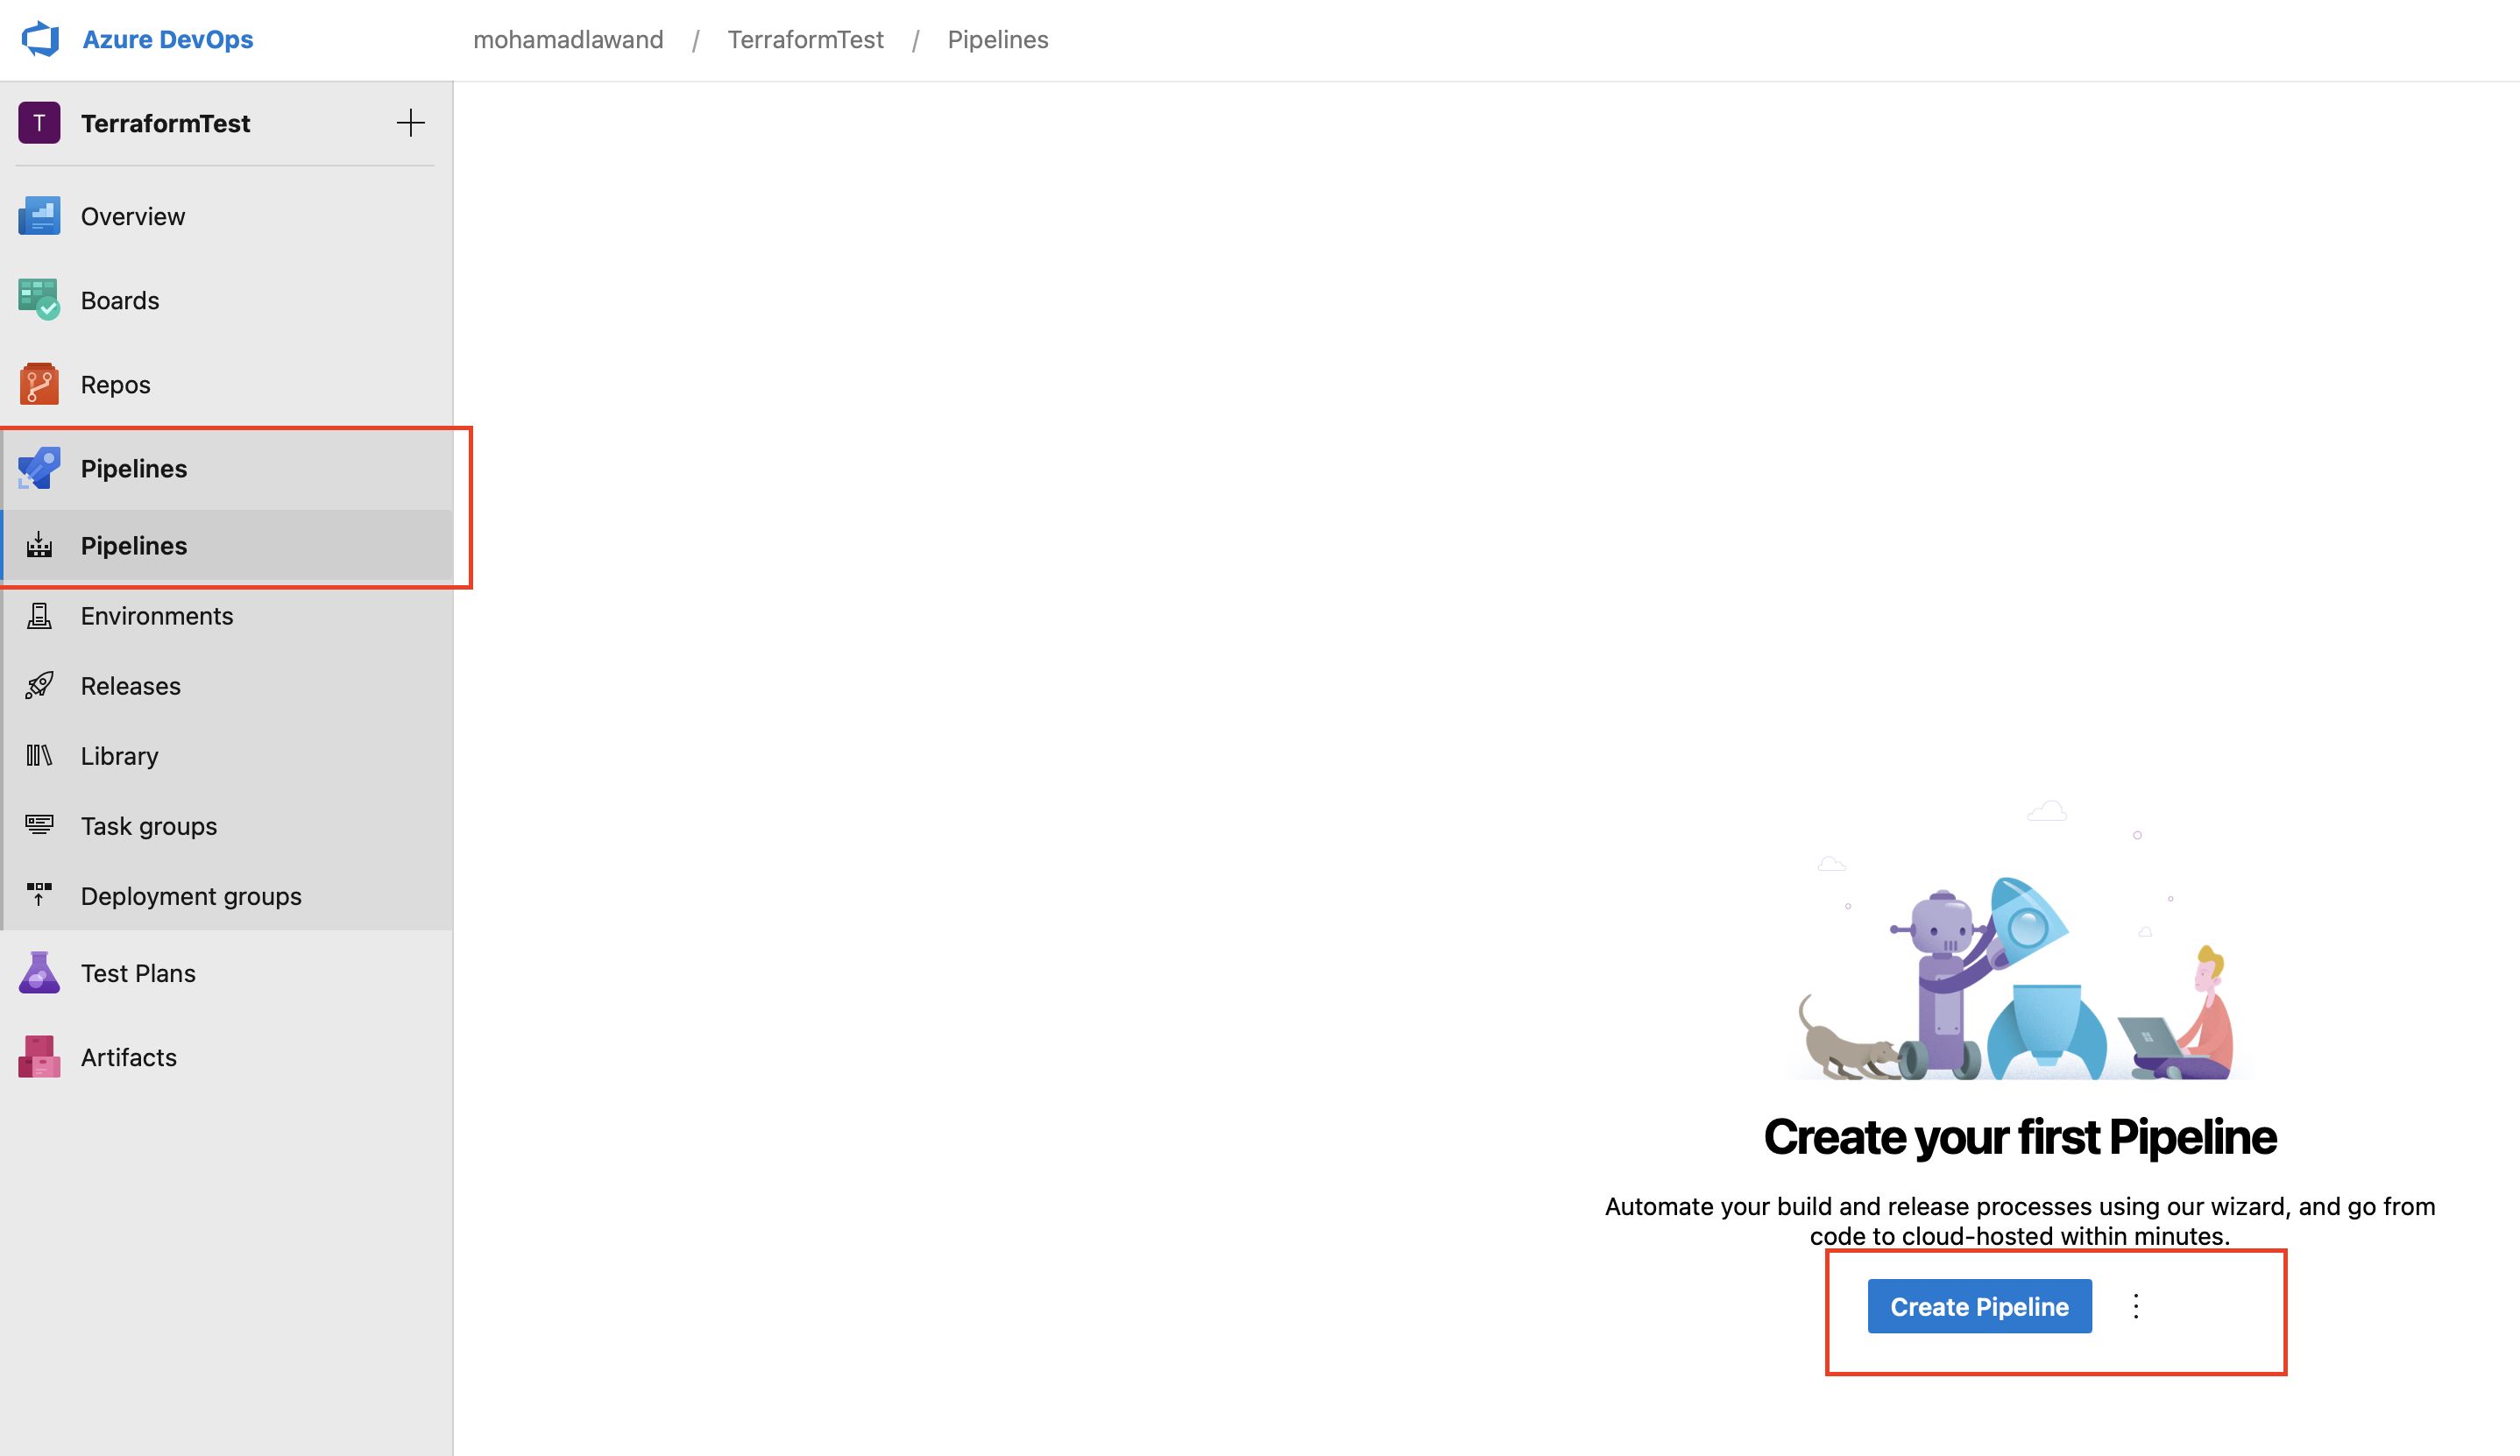
we click on pipelines in the menu
- Click on Create pipeline
- Choose Github (YAML) from the list
- Authorise github by signing in
- Choose the correct repo from the list
- Confirm selection
- Click on show more
- Select Docker (Build a docker image)
- Select Validate and Configure
- This will generate a YML file
- Now click on show assistance
- choose from the list "Docker Build or push Docker images..."
- For the container registry "Docker hub"
- For Container repository, we put the name of the docker image "mohamadlawand/sampleapi"
- Click on Add
- Now we can see our YML file has been updated and a new task has been added
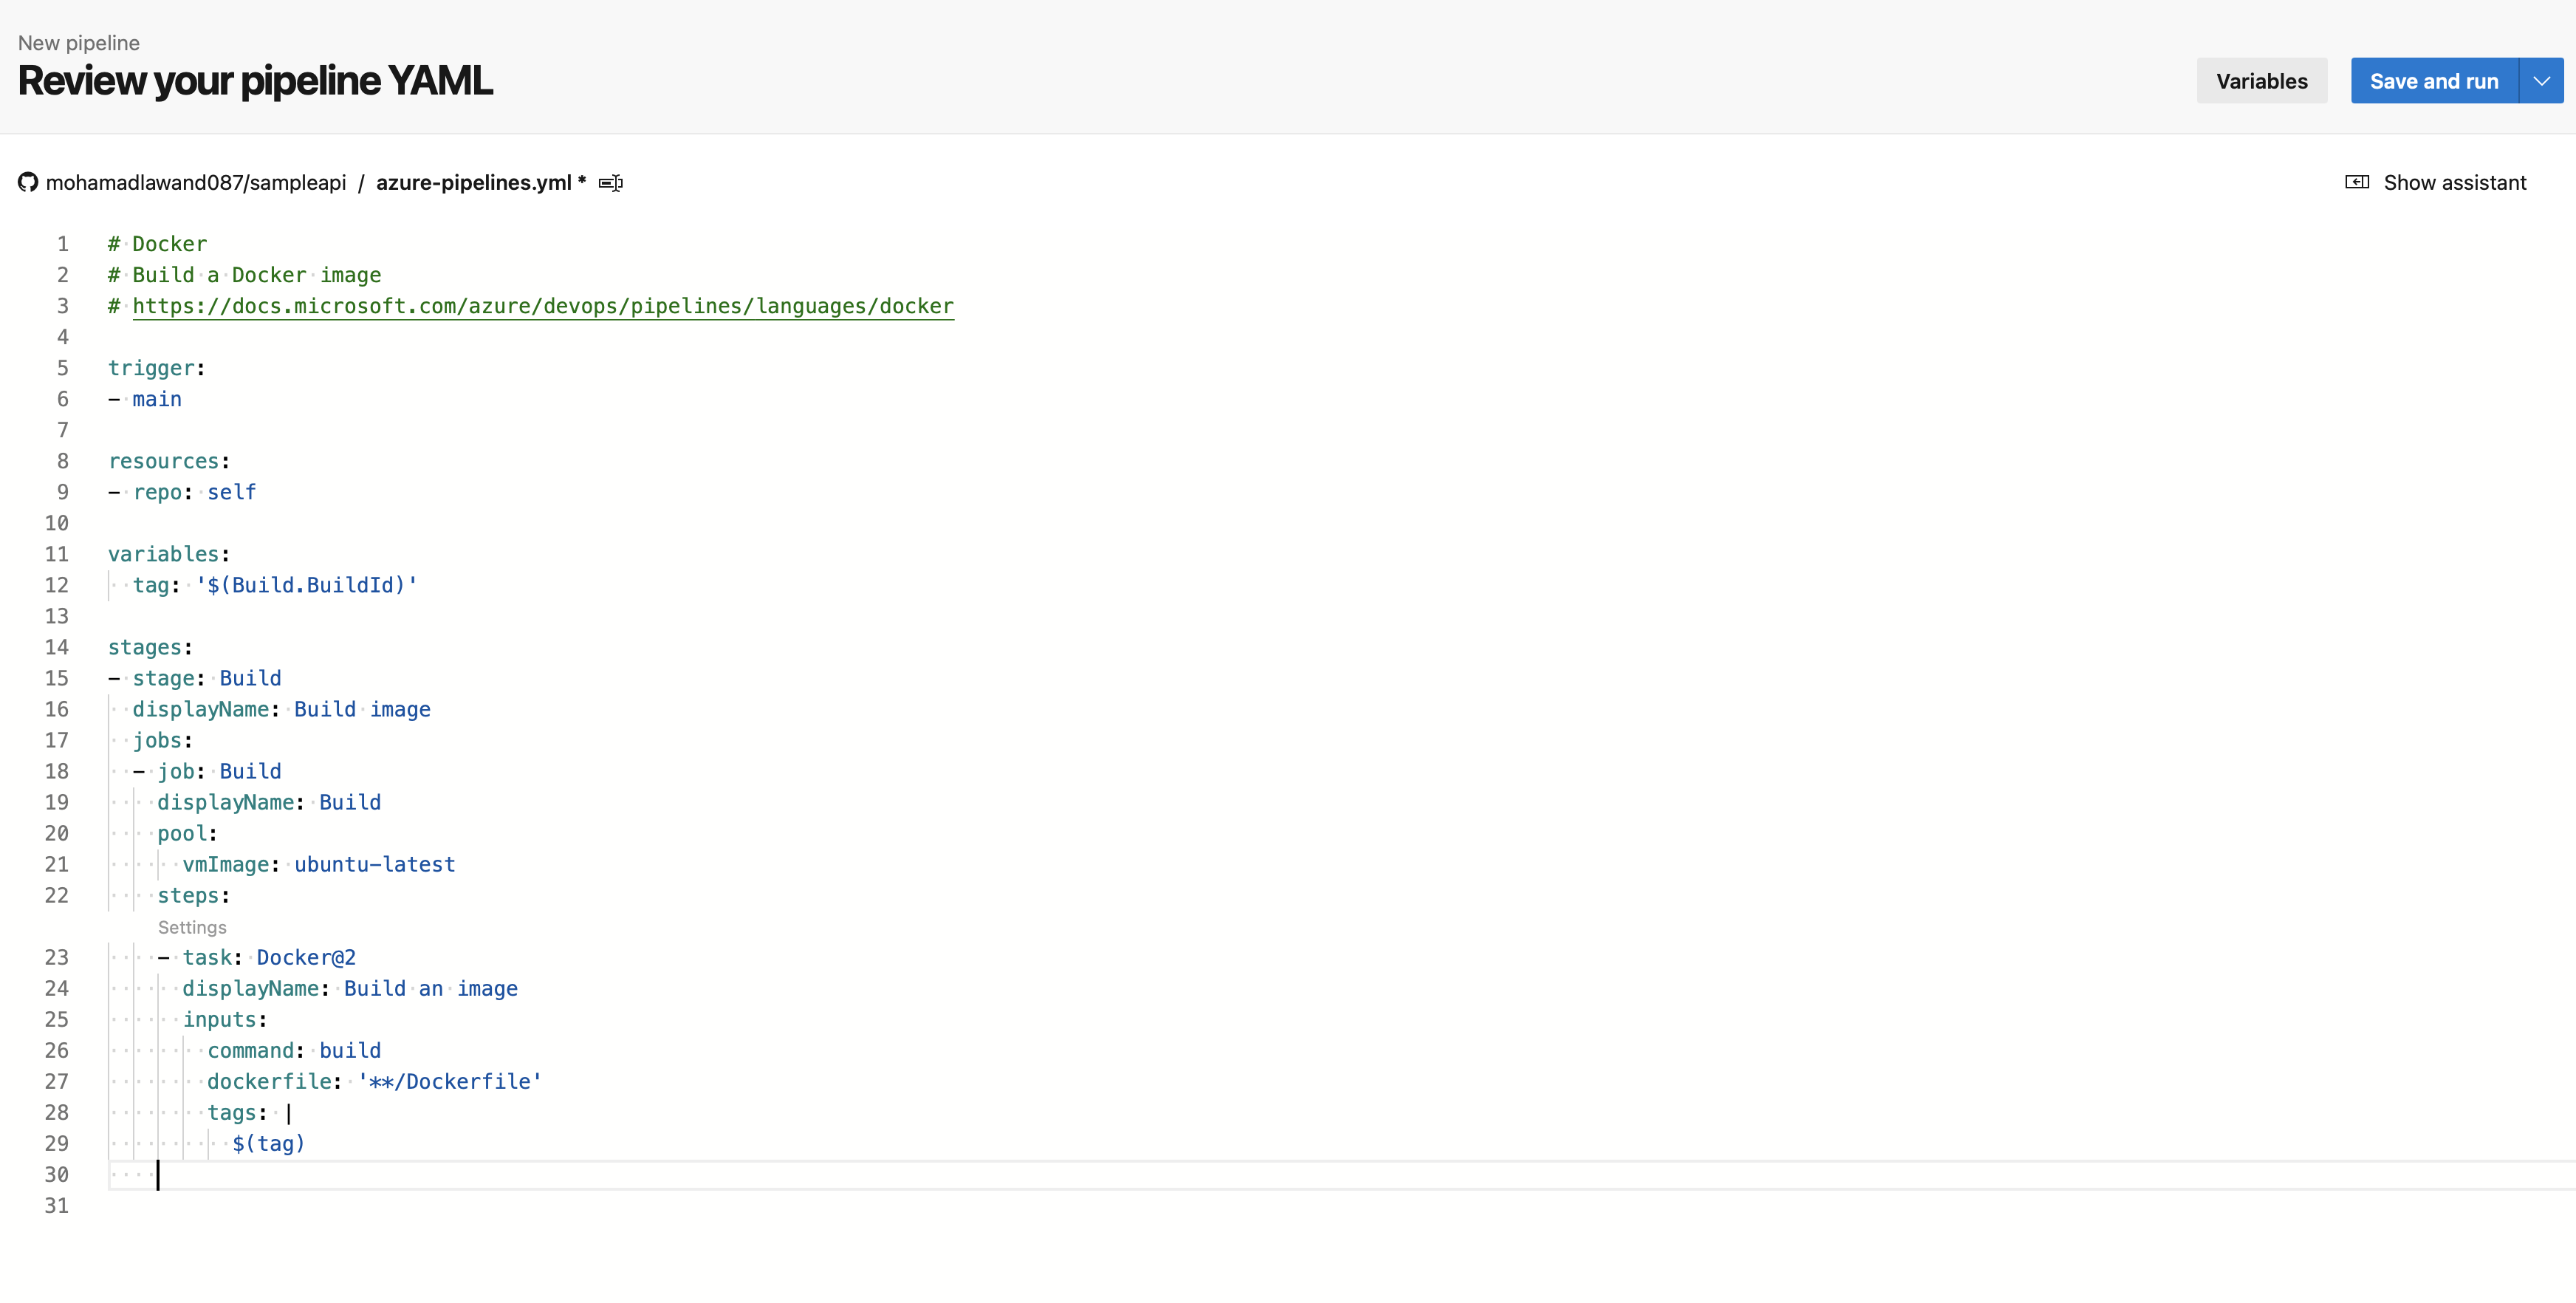
Now let us edit the existing YML file as the following
```bash
Docker
Build a Docker image
docs.microsoft.com/azure/devops/pipelines/l..
trigger:
main
resources:
repo: self
variables: tag: '$(Build.BuildId)'
Azure DevOps works as hierarchy
stages: # step 1
stage: Build displayName: Build image jobs:
- job: Build # step 2
displayName: Build
pool:
vmImage: ubuntu-latest
steps: # step 3
- task: Docker@2
inputs:
containerRegistry: 'Docker hub'
repository: 'mohamadlawand/sampleapi'
command: 'buildAndPush'
Dockerfile: '**/Dockerfile'
tags: |
$(tag)
- task: Docker@2
inputs:
containerRegistry: 'Docker hub'
repository: 'mohamadlawand/sampleapi'
command: 'buildAndPush'
Dockerfile: '**/Dockerfile'
tags: |
- job: Build # step 2
displayName: Build
pool:
vmImage: ubuntu-latest
steps: # step 3
Let us click on Save and run
- It will ask us to commit the changes into our repo, it will save the Azure Pipeline into our source code
And it will create the pipeline
Notes:
Azure dev ops works with hierarchy starts with stage ⇒ job ⇒ task
The YML file is space sensitive
Now if we go to Dockerhub we can see the image has been created successfully.
Now let us go back to VSCode and pull down the latest version of the code, so we can get the newly created AzurePipeline code that got added for us.
And now let us do some minor changes and commit it to see if the pipeline will automatically run.
inside the WeatherForecastController.cs in our controllers directory let us add the following
private static readonly string[] Summaries = new[]
      {
          "Freezing", "Bracing", "Chilly", "Cool", "Mild", "Warm", "Balmy", "Hot", "Sweltering", "Scorching", "Raining"
      };
Now let us commit this change and see if it will pick it up.
Now we can see the pipeline is automatically initiated and a new docker image has been deployed.
So in order to bring terraform into this implementation we need to integrate the service principle that we have created in Azure. And in order for terraform to utilise the service principle it will need access to the variables that we have created.
To add these variables to our Azure DevOps portal we need to do the following
Go to dev.azure.com
- under pipeline we need to click on library
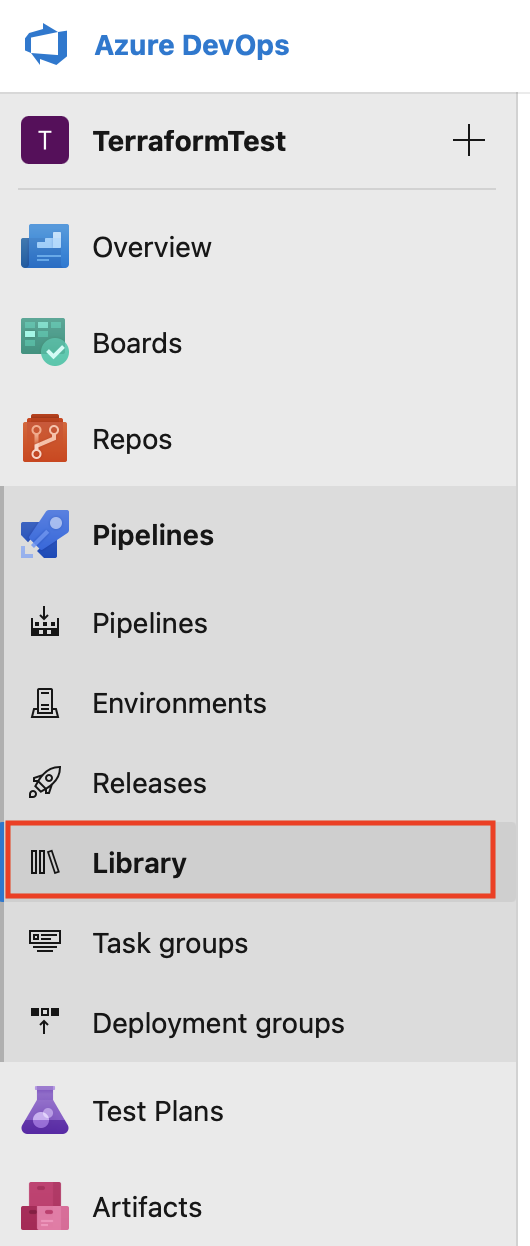
- Click on + variable group
- Give it any name
- And under Variable click on + Add
- and add the 4 variables that we have created before
- ARM_CLIENT_ID
- ARM_CLIENT_SECRET
- ARM_TENANT_ID
- ARM_SUBSCRIPTION_ID
Click on Save

Now one of the main important files for terraforms other then the main.tf file that we have created is the terraform.tfstate file that is automatically created by terraform when we plan and apply our terraform configurations
Locally this file will persist since we have it on our local dev machine, but when this file is used within our dev pipeline it is created and destoryed after the pipeline has executed since there is no place for it to be stored. For this reason we will create a new azure storage account and we will link it to our pipeline so the tfstate file will live there. So when we execute any changes to our infrastructure it will be available for us to use.
Now let us navigate to our Azure portal, in order for us to connect our pipeline with a storage account we need to create some resources on azure. The list of resources are as follow
resource group
- storage account ⇒ blob
- container
file (main.tf)
We will start by creating a resource group on Azure

Click on Resource Group
- Click on Create
- Give it a name "rg_st_tf"
- Choose the region
- Click on Review + Create
Click on Create
Since this is a configuration step we don't really need to do it in terraform.
Now we need to create a storage account

Click on Create Resource from the homes screen
- Type "Storage account" in the search box
- choose "Storage account"
- Click create
- Choose a resource group
- Give it a name "tfstaccsa"
- choose region
- Choose redundancy LRS
- Click on Review + Create
Click on Create
Now let us go to the newly created storage account
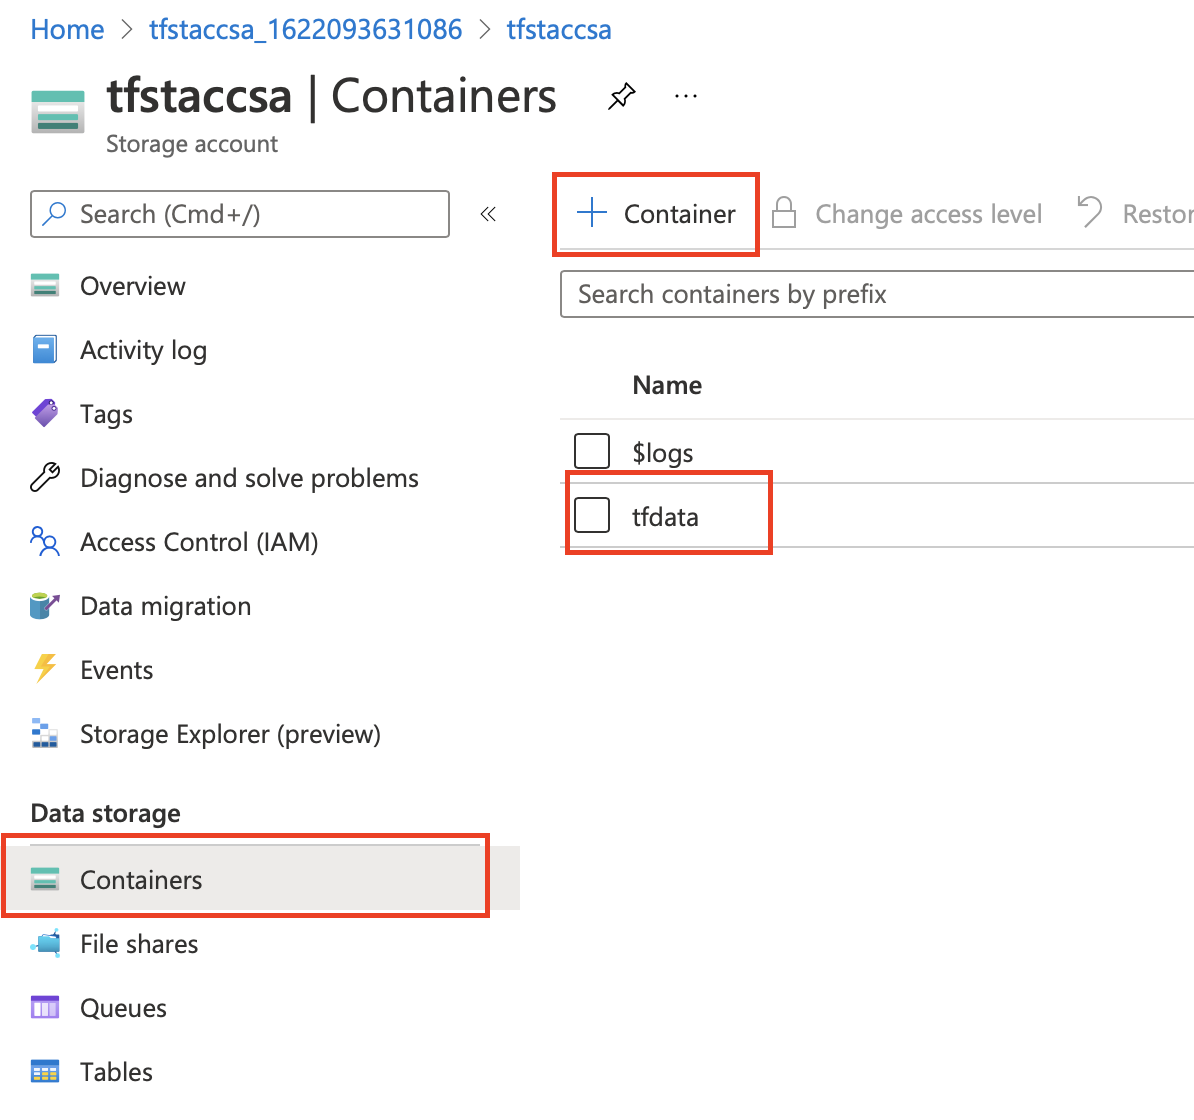
click on container from menu under Data storage
- click on + Container
- give it a name "tfdata"
click create
Now lets move back to VS code and open [main.tf] so now lets update it with the following after the provider initialisation add the following
terraform {
backend "azurerm" {
  resource_group_name = "rg_st_tf"
  storage_account_name = "tfstaccsa"
  container_name = "tfdata"
  key = "terraform.tfstate" # refers to the file name
}
}
Thats all we need to do to configure terraform to use the blob storage to save the state files instead the local or temp directory.
Now let us open azure-pipeline.yml and we need to add a new stage to utilise terraform
```yaml
stage: Provision displayName: 'Creating terraform on Azure' dependsOn: Build jobs:
job : provision displayName: 'Provision container instance' pool: vmImage: ubuntu-latest variables: # vars from azure devOps in library
group: SampleAPIVariables steps:
script: | set -e
terraform init -input=false terraform apply -input=false -auto-approve name: 'RunTerraform' displayName: 'Run Terraform' env: # these vars are being passed from our SampleAPIVariables that we specified in Azure DevOps ARM_CLIENT_ID: $(ARM_CLIENT_ID) ARM_CLIENT_SECRET: $(ARM_CLIENT_SECRET) ARM_TENANT_ID: $(ARM_TENANT_ID) ARM_SUBSCRIPTION_ID: $(ARM_SUBSCRIPTION_ID) TF_VAR_imagebuild: $(tag) ```
One thing we want to do is to make sure that we are deploying the latest version of our docker image to azure to do that we need to pass the image build number from our azure pipeline to our terraform file. To do that we need to do the following
variable "imagebuild" {
type = string
description = "the latest image build version"
}
And update the container section in our main.tf
# Specify the container information
container {
  name = "sampleapi"
  image = "mohamadlawand/sampleapi:${var.imagebuild}"
  cpu = "1"
  memory = "1"

  ports {
      port = 80
      protocol = "TCP"
  }
}
}
Now lets go to Azure and delete the resource group for our current container from there
To test this let us push our changes to github and see the result
- Copy the Subscription Id
Thank you for reading, please ask your questions in the comments.