


In this article we will be resuming our journey to learn Angular.
This Part 2 of our series to cover Angular from all different aspects, you can find the link for the first part down below:
Part 1: dev.to/moe23/intro-to-angular-part-1-428o
You can watch the full video on Youtube:
And you can get the source code on GitHub:
So what we will cover today:
- Custom Styles
- Nested Components
- Services
- HTTP Calls
- Observables
Let us open the application that we started in our last video, the source code is available on GitHub:
Let us run the application and make sure everything is running as it should be. We will use the following command
ng serve -o
Styling
Let us add some styles to our component. We need to make this style available only for this component to do that we can utilise the styleUrl field in the component to add out custom css class.
Inside our users folder will create a new file called user-list.component.css
thead {
    color: cadetblue;
}
Now we need to link this style with our component, to do that we need to update our component decorator with the link to this style sheet.
@Component({
    selector: 'pm-users',
    templateUrl: './user-list.component.html',
    styleUrls: ['./user-list.component.css']
})
Nesting a component
let us now see how we can nest one component into another, to accomplish that we would need to have a nested component (the component which is going to be inside another component) and a container component (which will be hosting the nested container)

Now let say we want to add a skill level in cooking for our users we will first need to adjust our IUser interface and add the new field to make the IUser interface as the following
export interface IUser {
    userId: number,
    fullName: string,
    email: string,
    phone: number,
    country: string,
    cookingRating: number
}
Next we will need to update the user-list.component.ts users list to accommodate this change will need to update the users list to the following
users: IUser[] = [
        {
            "userId": 1,
            "fullName": "Mohamad Lawand",
            "email": "mohamad@email.com",
            "phone": 123123,
            "country": "Lebanon",
            cookingRating: 2
        },
        {
            "userId": 2,
            "fullName": "Richard Feynman",
            "email": "richard@email.com",
            "phone": 111222333,
            "country": "United States",
            cookingRating: 4
        },
        {
            "userId": 3,
            "fullName": "Neil Degrass Tyson",
            "email": "neil@email.com",
            "phone": 99000999,
            "country": "United States",
            cookingRating: 3
        }
    ];
then we will need to update our template to display this rating
<th>Cooking Rating</th>

<td> {{ user.cookingRating }} </td>
Let us install the FontAwesome library and add it to our Angular application
npm install font-awesome
Inside the Styles.css we need to add the following
@import url(~font-awesome/css/font-awesome.min.css);
Now that we have updated our original code we would want to create a nested component that can be reusable across our application.
Will start by creating a new folder in the app folder called Shared where all of our shared code will live. Inside the shared folder will create the following
- star.component.html
- star.component.ts
- star.component.css
Now let us add the code for the following section, will start by the star.component.html
<div class="crop"
        [style.width.px]="cropWidth"
        [title]="rating">
    <div style="width: 75px">
        <span class="fa fa-star"></span>
        <span class="fa fa-star"></span>
        <span class="fa fa-star"></span>
        <span class="fa fa-star"></span>
        <span class="fa fa-star"></span>
    </div>
</div>
Then with the class star.component.ts
import { Component, OnChanges } from "@angular/core";

@Component({
    selector: 'pm-star',
    templateUrl: './star.component.html',
    styleUrls: ['./star.component.css']
})

// we are using the OnChange app lifecycle
export class StarComponent implements OnChanges {
    rating: number = 4;
    cropWidth: number = 75;

    ngOnChanges(): void {
        this.cropWidth = this.rating * 75/5;
    }
}
And the css star.component.css
.crop {
    overflow: hidden;
}
div {
    cursor: pointer;
}
Now its time to nest this component into a container component
The first thing we need to do is update the user component with the tag for the nested component
<td>
    <pm-star></star>
</td>
Next we want to tell Angular where to find this directive, we need to update the app.module.ts
import { StarComponent } from './shared/star.component';

StarComponent
Now if we run the application we can see the stars are showing but there is an issue, we are always seeing 5 stars and stars cropping functionality is not working, we will fix this next.
In an interactive application the nested component will need to communicate with the container component. The nested component will receive information from its container using input properties.
The nested component returns information to its container by emitting events. Will start by updating the the star.component.ts to utilise the input properties. We will need to update the rating to the following
@Input() rating: number = 0;
And now in the user-list template we will need to update the component the take advantage of the nested property
<td>
    <pm-star [rating]='user.cookingRating'></pm-star>
</td>
The next step is we want to create a functionality where the nested component will be able to communicate with the container
the only way a nested component can communicate with the container is through events so how do we do this, first let us discuss what are we going to do we will create a functionality where each time we click on the star component (nested component) the rating will show in the container.
First we need to update the star.componet.ts
import { Component, EventEmitter, Input, OnChanges, Output } from "@angular/core";

@Component({
    selector: 'pm-star',
    templateUrl: './star.component.html',
    styleUrls: ['./star.component.css']
})

// we are using the OnChange app lifecycle
export class StarComponent implements OnChanges {
    @Input() rating: number = 0;
    cropWidth: number = 75;
        // We added the event output emitter of type string
    @Output() ratingClicked: EventEmitter<string> =
        new EventEmitter<string>();

    ngOnChanges(): void {
        this.cropWidth = this.rating * 75/5;
    }

        // we added the onclick functionality to output the clicked event
    onClick(): void {
        this.ratingClicked.emit(`the rating ${this.rating} was clicked`);
    }
}
Then we need to update the star.component.html to add the event click
<div class="crop"
        [style.width.px]="cropWidth"
        [title]="rating"
        **(click)='onClick()'**>
    <div style="width: 75px">
        <span class="fa fa-star"></span>
        <span class="fa fa-star"></span>
        <span class="fa fa-star"></span>
        <span class="fa fa-star"></span>
        <span class="fa fa-star"></span>
    </div>
</div>
Now we need to update the container component to list to the events coming from the nested components. First we update the user-list.component.html
<pm-star [rating]='user.cookingRating'
        (ratingClicked)='onRatingClicked($event)'></pm-star>
Next we update the user-list.component.ts
onRatingClicked(message: string) : void {
        this.pageTitle = 'User list ' + message;
    }
Services
Components are great, but how do we handle data that needs to be shared across components, we build services to tackle this issue
What is a Service, a service is a class with a focused purpose, we use services to
- Implement functionality which is independent from any specific component
- Share data or logic across components
- API calls and data management
Let us discuss how Services and Dependency injection works in angular. Let us say we have a service called myService and we have a component which wants to utilise it
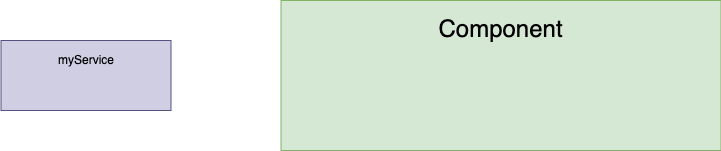
There is 2 ways that the component will be able to utilise the service the first ways is to directly initialise the service inside the component
let mySVC = new myService()
This method will work but its not recommended as the data that is going to generate will be limited to this component and it will be very hard to create unit tests for this service
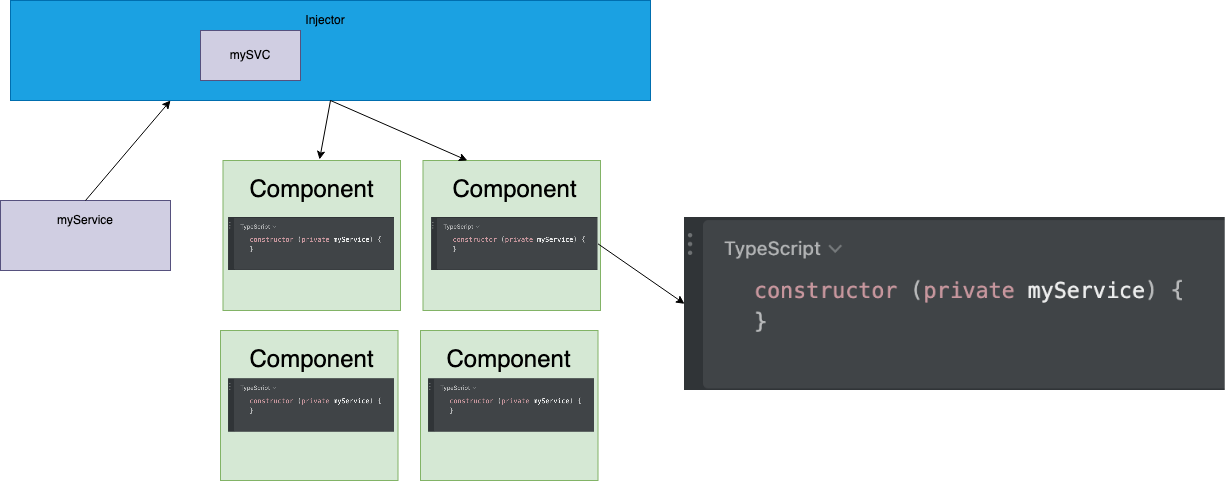
The second option is to utilise dependency injection, how do we that? we register our service with Angular. Angular then creates a single instance of that service (Singleton) and holds this instance to be shared across components. Angular provides a built in injector which is responsible of injecting this instance of the service into component. when a component needs a service the component class will add that service to the constructor, the component class define the service as a dependency this process is called DI dependency injection
Since Angular is managing the services all of the data is shared across the components DI is the recommended way to utilise services
constructor (private myService) {
}
Now let us build our own service
How we create a service we need to follow these steps:
- Create a class
- Add the meta data
- Import the libs
Since our service will only provide user data we will add it to the users folder, inside the users folder we need to create a new file called user.service.ts
import { Injectable } from "@angular/core";
import { IUser } from "./User";

@Injectable()
export class UserService {

    getUsers(): IUser[] {
        return [
            {
                "userId": 1,
                "fullName": "Mohamad Lawand",
                "email": "mohamad@email.com",
                "phone": 123123,
                "country": "Lebanon",
                cookingRating: 2
            },
            {
                "userId": 2,
                "fullName": "Richard Feynman",
                "email": "richard@email.com",
                "phone": 111222333,
                "country": "United States",
                cookingRating: 4
            },
            {
                "userId": 3,
                "fullName": "Neil Degrass Tyson",
                "email": "neil@email.com",
                "phone": 99000999,
                "country": "United States",
                cookingRating: 3
            }
        ];
    }
}
Now we need to register the service with the injector, but first we need to cover the 2 types of injection
- root application injector: service registered with the root application injector is available across the application
- component injector: service which is registered with the component injector, its only available for that component, and its child or nested components. This will isolate the service which is used by only 1 component, provide multiple instances for each instance of the component
Now let us update the service and register it in the root injecor
@Injectable({
    providedIn: 'root'
})
Now we need to provide the service as a dependency so we can get access to it inside our component .
The way we do dependency injection in Angular is the same way we do it in TypeScript through the constructor, every class in TypeScript has a constructor. If we don't specify the constructor explicitly a constructor is created implicitly
The way we define a constructor in TypeScript is with a constructor function, its used for code initialisation
private _userService;
constructor(userService: UserService) {
    _userService = userService;
}
which can be summarised into this
constructor(private userService: UserService) {
    }
Now let us implement the product service inside our component
import { Component, OnInit } from "@angular/core";
import { IUser } from "./User";
import { UserService } from "./user.service";

@Component({
    selector: 'user-list',
    templateUrl: './user-list.component.html',
})

export class UserListComponent implements OnInit {
    pageTitle: string = "User List Title";
    filteredUser: IUser[] = [];
    **users: IUser[] = [];**
    phoneNumberVisible : boolean = false;
    private _listFilter: string = '';

    **constructor(private userService: UserService) {
    }**

    get listFiler(): string {
        return this._listFilter;
    }

    set listFiler(value: string){
        this._listFilter = value;
        // Adding the filtration process
        this.filteredUser = this.performFiltration(value);
    }

    // Defining a new method
    showNumbers(): void {
        this.phoneNumberVisible = !this.phoneNumberVisible;
    }

    ngOnInit(): void {
        console.log("I am loading on ngOnInit");
        this.listFiler = '';

                // here we assign the users variable with the values that our service provide
        **this.users = this.userService.getUsers();

                // since we are binding to our filtered users we need to make the user list available
        this.filteredUser = this.users;**
    }

    performFiltration(filterBy: string) : IUser[] {
        filterBy = filterBy.toLowerCase();
        return this.users.filter((user: IUser) => user.fullName.toLowerCase().includes(filterBy));
    }

    onRatingClicked(message: string) : void {
        this.pageTitle = 'User list ' + message;
    }
}
HTTP Calls
Our next step is to learn how to used Http Requests with Observables to retrieve data.
Reactive Extensions (RxJS) is a library for composing data using observable sequences and transforming that data using operators. Specifically Asynchronous data
Synchronous When you execute something synchronously, you wait for it to finish before moving on to another task.
Asynchronous When you execute something asynchronously, you can move on to another task before it finishes.
Http Requests are Async
App wants to get the list of user via get request (HTTP) ⇒ WebServer, we request the data from it
Setup a notification for when the data is returned
process difference requests
WebServer sends us the user data ⇒ receive data in our app
The notification system will let us know that the application has received a response (RxJS Observable sequence)
it will process the response
Observable
is a collection of items over time, unlike an array it doesn't store the items instead when the data is being emitted it can be observed over time
Array: [A,B,C,D,E]
Observables the data will pass overtime, an observable will not be beneficial until we subscribe to an observable. when we subscribe observable will start emitting notifications there is 3 types of notification
- next: notify when the next item is emitted
- error: if there is an error the observable will emit an error notification and no more items are processed
- complete once everything has been processed the complete notification is emitted.
The process of doing a http call will be as follow
- Http get request
- HTTP get returns an observable ⇒ which will emit notifications
- We will subscribe to the observable
- Send the HTTP Get request
- Application continues processing requests
- When the API respond with data
- The observable will emit a next notification
- we process the emitted response
Observable Pipe
a common way to use observables is
- start the observable and subscribe
- Pipe emitted items through a set of operators
- Process notifications: next, error, complete
- Stop the observable by unsubscribe
so now let us implement this functionality, first we need to open the app.module.ts and add the following
import { HttpClientModule } from '@angular/common/http';

imports: [
    BrowserModule,
    AppRoutingModule,
    FormsModule,
    **HttpClientModule**
  ],
Now lets go to our user.service.ts that we created and update it to the following
import { HttpClient, HttpErrorResponse } from "@angular/common/http";
import { Injectable } from "@angular/core";
import { Observable, throwError } from "rxjs";
import { IUser } from "./User";
import { catchError, tap } from 'rxjs/operators';

@Injectable({
    providedIn: 'root'
})
export class UserService {

    constructor(private http: HttpClient) {}

    // specify the url
    private usersUrl = 'https://localhost:5001/Users';

    getUsers(): Observable<IUser[]> {
        // We call the pip method to specify a set of operator
        return this.http.get<IUser[]>(this.usersUrl).pipe(
            tap(d => console.log('response' , JSON.stringify(d))),
            catchError(this.handleError)
        );
    }

    private handleError(err: HttpErrorResponse) {
        let errorMessage = '';
        console.log(err);
        return throwError(errorMessage);
    }
}
Next we need to update user-list.component.ts
import { Component, OnDestroy, OnInit } from "@angular/core";
import { Subscription } from "rxjs";
import { IUser } from "./User";
import { UserService } from "./user.service";

@Component({
    selector: 'user-list',
    templateUrl: './user-list.component.html',
    // providers: [UserService]
})

export class UserListComponent implements OnInit,  OnDestroy {
    pageTitle: string = "User List Title";
    filteredUser: IUser[] = [];
    users: IUser[] = [];
    phoneNumberVisible : boolean = false;
    errMessage: string = '';
    private _listFilter: string = '';
    sub: Subscription;

    constructor(private userService: UserService) {
    }

    get listFiler(): string {
        return this._listFilter;
    }

    set listFiler(value: string){
        this._listFilter = value;
        // Adding the filtration process
        this.filteredUser = this.performFiltration(value);
    }

    // Defining a new method
    showNumbers(): void {
        this.phoneNumberVisible = !this.phoneNumberVisible;
    }

    ngOnInit(): void {
        console.log("I am loading on ngOnInit");
        this.listFiler = '';

        // here we assign the users variable with the values that our service provide
        this.userService.getUsers().subscribe({
            next: users => {
                this.users = users;

                // since we are binding to our filtered users we need to make the user list available
                this.filteredUser = this.users;
            },
            error: err => this.errMessage = err
        });


    }

    performFiltration(filterBy: string) : IUser[] {
        filterBy = filterBy.toLowerCase();
        return this.users.filter((user: IUser) => user.fullName.toLowerCase().includes(filterBy));
    }

    onRatingClicked(message: string) : void {
        this.pageTitle = 'User list ' + message;
    }

    ngOnDestroy(): void {
        this.sub.unsubscribe();
    }
}